How to setup permissions for a role?
Categories: Employees
Step 1
Go to “Manage > Employees > Roles & Permissions”.
Step 2
Click on the “Add Role” button for add new role.

Or choose the “Edit” menu item in the ellipsis menu to set up a role that already exists.

Step 3
Go to “General Settings”.
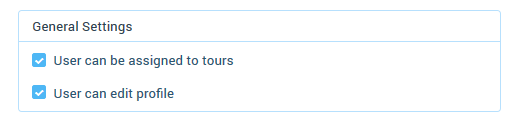
Set up user general settings:
- “User can be assigned to tours”
This option allows you to assign an employee to different sessions and bookings at the same time.
Step 4
Set up following settings:
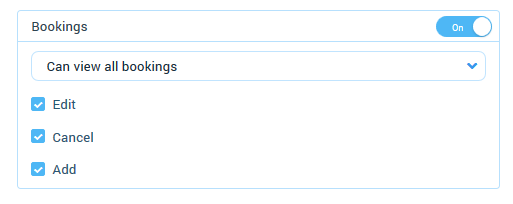
- “Bookings”
If this options is turned on, allows to manage displayed bookings for an employee:
- “Can view all bookings” - an employee can see all bookings;
- “Can view only assigned bookings” - an employee can see only those bookings, that he did himself.
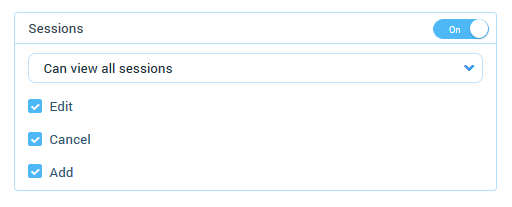
- “Sessions”
If this option is turned on, allows to manage displayed sessions for an employee:
- “Can view all sessions” - an employee can see all sessions;
- “Can view only assigned sessions” - an employee can see those sessions, in resources which he is assigned, or if there are cards with resources/employee available for him.
- “Marketplace”
If this option is turned on, an employee can book on the “Marketplace”, add tours to “My Tours”, ask for net rates, add Agents and Suppliers.

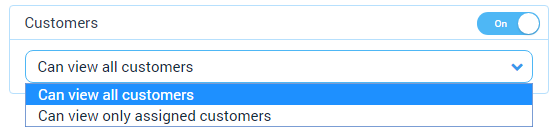
- “Customers”
If this option is turned on, allows to manage displayed customers for an employee:
- “Can view all customers” - can view all Customers;
- “Can view only assigned customers” - can view only those Customers, that are in allowed bookings.
- “My Agents”
If this option is turned on, “My Agents” section is displaying only for Suppliers.

- “My Suppliers”
If this option is turned on, “My Suppliers” section is displaying.

- “My Tours”
If this option is turned on, an employee can view “My Tours” in section “Manage”, that appears in “Top Menu”.

- “Company Details”
If this option is turned on, an employee can view and edit “Company Details” in section “Manage”, that appears in “Top Menu”.

- “Visual Preferences”
If this option is turned on, an employee can view and edit “Visual Preferences” in section “Manage”, that appears in “Top Menu”.

- “Resources”
If this option is turned on, allows to manage displayed resources for an employee in the section “Manage > Resources”, that appears in “Top Menu”:
- “Can view all resources” - an employee can view all resources.
- “Can view only assigned resource types” - an employee can view only those resources, that you choose in a dropdown.
3 checkboxes displayed under dropdown:
- “Edit” - an employee can edit resources he is assigned to.
- “Delete” - an employee can delete resources types and categories.
- “Add” - an employee can add resource categories.

- “Net Rates”
If this option is turned on, an employee can view and edit “Net Rates”, and create “Pricing Seasonal Rules” in the section “Manage”, that appears in “Top Menu”.

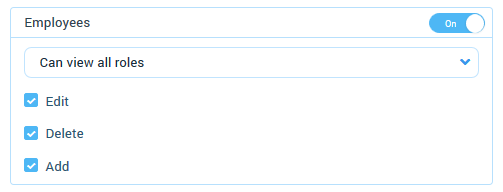
- “Employees”
If this option is turned on, allows to manage displayed roles for an employee:
- “Can view all roles” - an employee can view all roles;
- “Can view only assigned roles” - an employee can view only those roles, that you choose in a dropdown.
3 checkboxes displayed under dropdown:
- “Edit” - an employee can edit roles;
- “Delete” - an employee can delete roles;
- “Add” - an employee can add new roles.
- “Fees & Taxes”
If this option is turned on, an employee can view and edit “Fees & Taxes” in section “Manage”, that appears in “Top Menu”.

- “Extras”
If this option is turned on, an employee can view and edit “Extras” in section “Manage”, that appears in “Top Menu”.

- “Participants”
If this option is turned on, an employee can view and edit “Participants” in section “Manage”, that appears in “Top Menu”.

- “Pick-ups”
If this option is turned on, an employee can create and edit pick-up lists, locations, areas in section “Manage > Pick-ups”, that appears in “Top Menu”.

- “Regional Settings”
If this option is turned on, an employee can view and edit regional settings in section “Manage > Regional Settings”, that appears in “Top Menu”.

- “Vouchers / Tickets”
If this option is turned on, an employee can create and edit vouchers/tickets in section “Manage > Vouchers / Tickets”, that appears in “Top Menu”.

- “My Website”
If this option is turned on, an employee can edit access and view of “White Labеl” in section “Manage > My Website”, that appears in “Top Menu”.

- “Tags”
If this option is turned on, an employee can create and edit tags in section “Manage > Tags”, that appears in “Top Menu”.

- “Coupons”
If this option is turned on, an employee can create and edit coupons in section “Manage > Coupons”, that appears in “Top Menu”.
